Content Hub tips & tricks – Selection component shows wrong name in linked Search component

Problem and context

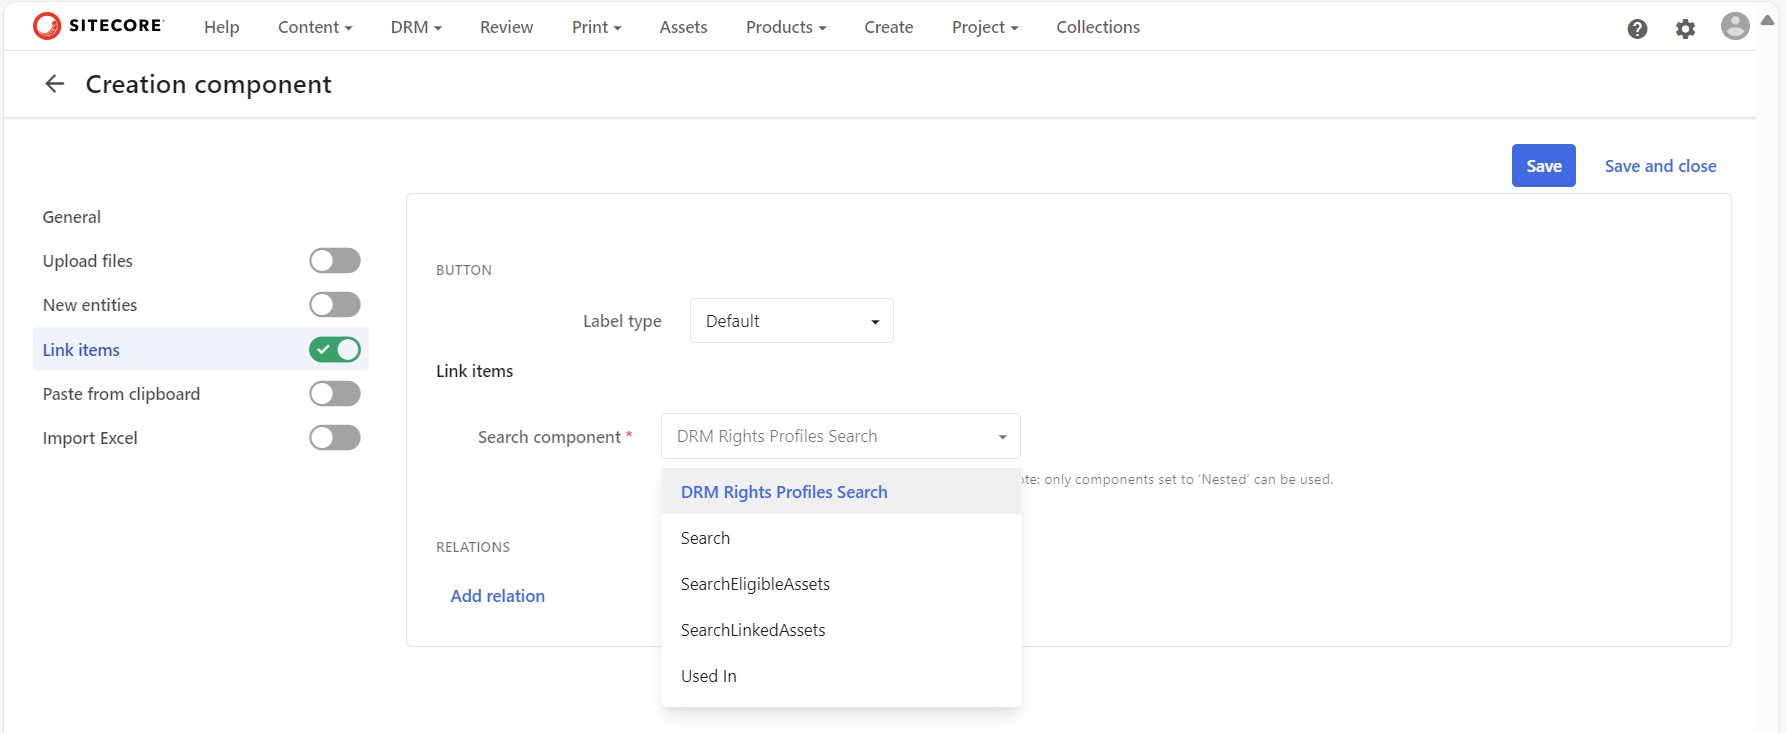
Consider the scenario as per the screenshot above. You are configuring a second Search component on your Assets search page. You make a genuine mistake and name your second Search component identical with your existing one, as shown. In this case, you would like to link your second Search component with your existing Selection component as shown.

Selection component shows ‘duplicates’

I know that I have made a genuine mistake of using the same ‘search‘ name for my second Search component. My selection component will display the following.

This is obviously confusing and we don’t know which is which. Now I will try rectify my mistake, and rename my second Search component.

Renaming Search component

Do rename my second Search component, I click on the Settings button shown below

Which opens the Settings pop up, from where I will specify a new Title as shown below and Save it.

Below is the outcome showing my second Search component renamed.

Selection component still shows ‘previous’ name

After this change, I was expecting my Selection component to show ‘searchRenamed’. However, I still have the same problem as shown below.

Sitecore Technical support have logged a product bug

I reached out to Sitecore Technical support and shared my use case above. Below is the response I received.

Hi Julius,

Based on the provided information we would like to define the scope of the current case:

Issue definition: in the drop down list the PageComponent.Name property is used instead of PageComponent.Title in the Linked search component (in the Selection component).
Investigation target: we will work diligently to help find the root cause and a resolution to the defined issue.

Additional notes:

[Redacted]

The issue reported has been registered as an issue in the Content Hub product.

The reference of the bug report is the following: MONE-44866, which can be further reviewed and followed-up via the support portal in the “My Product Issue” page

Tips and tricks

Currently, the Selection component’s Linked search component drop down list uses the PageComponent.Name instead of PageComponent.Title. While Sitecore have acknowledged this as product bug, you can easily work around this issue.

  1. If you are going to create more than one Search Component, ensure you name the appropriately with distinct and easily identifiable titles. This is because the title will be used as the component name in the backend, which will ultimately be displayed on the list when linked to Selection component.
  2. If you initially assign your second Search Component the same name as the first one, then renaming the second component will NOT resolve the issue as I have explained in this blog post. Either delete the second Search component and create a new one with a unique Title.
  3. Or, use the Entity Management page to rename the Name of the second Search component to make it unique, as shown below. You will need to know the Entity Id of your second Search component.
  4. Entity Management page can be accessed using the URL below
https://<your-instance-url>/en-us/admin/entitymgmt/entity/<ENTITy_ID>

Next steps

In this blog post, we have looked at a scenario where having more than one Search components with the same name causes ‘duplication’ issue with your Selection component Linked Search component list. I have shared some tips and tricks to help you work around this issue.

Stay tuned and leave please us any feedback or comments.

Content Hub – defining self-referencing relations, creating, linking and displaying entities – part 2

Introduction

In the previous blog post, I introduced you to self-referencing relations in Content Hub, plus possible use-cases for them. In this blog post, I will focus on how to create and populate self-referencing entities and display them within Content Hub.

Displaying linked assets on the Asset Details page

As discussed in the previous blog post, a typical use case for self-referencing relations is to link a set of assets to a parent or master asset.

Below is a mockup of the parent or master asset details page to illustrate this use-case.

This is a typical asset details page that you get out-of-the-box with your Content Hub instance. I have done one customization to this page, to allow me to display our Linked assets panel as highlighted above.

As you can notice:

  • I am displaying panel heading ‘Linked assets’.
  • I have ‘+ Add existing items’ CTA button. This is the button when clicked, allows me to search for existing assets that I would like to link to the current parent or master asset.
  • I have a refresh button. This allows me to refresh the linked assets list without re-loading my entire page
  • A have list of linked three (3) assets shown in a tabular form, including the asset meta data of ID, Title and Article Type To Asset

We will now look at how I have built this linked assets panel.

Modifying Asset Details page

To customize the existing Asset details page, we need to view the Page designer component. From the ‘Manage’ dashboard, select ‘Pages’ component, which will open the ‘Pages’ window.

Search for ‘Asset details’ page, as shown below. As you can see, I have added a new section to the existing page layout. This section has the ‘Linked assets’ panel.

  • Linked assets – this is the panel component which contains the display components for linking the assets. Below is the settings popup for this panel.
  • SearchEligibleAssets – this is the Search component that I have configured to search and filter existing assets that will be linked to the parent or master asset. Below is the configuration settings for this search component.
  • Notice we are searching and only linking existing assets that have not been deleted.
  • The ‘SearchEligibleAssets’ component should be set to be ‘Nested’ component as we are using it from within our ‘Linked assets’ componet.

Linked assets panel component

Let us look at the components within our ‘Linked assets’ panel.

  • CreationLinkAssets – this is our Creation component, that will create new links based on the selected assets to our parent or master asset. Below is screenshot showing how we using it to link assets to the parent or master asset.
    • We need to link our ‘SeachEligibleAssets‘ Search component to the Creation component, as shown below
    • The assets to be linked are using our ‘AssetToLinkedAsset‘ relation, setting the Parent as shown above.
  • SearchLinkedAssets – is is our Search component that will display all existing and already linked assets to our parent or master asset. Below is configuration to achieve this
    • Ensure M.Asset is selected in ‘System’ filter
    • Then within the ‘Fixed’ filter, filter out using our ‘AssetToLinkedAsset’ relation as shown below
    • As specify we are displaying all assets which have the current asset (Page Entity) as their Parent using the self-referencing ‘AssetToLinkedAsset’ relation.
  • This is it. Done.

Next steps

In this blog post, we have done a deep-dive into how to create and populate self-referencing entities and link them up to create parent-child hierarchy and to display them within Content Hub.

Stay tuned and leave please us any feedback or comments.

Content Hub – defining self-referencing relations, creating, linking and displaying entities – part 1

What are relations

In Content Hub data modeling, relations are used to define how entities are linked together. One of the entity in this relationship will be a parent and the other will be a child. The relation can either

  • be between two different types, say M.AssetType and M.Asset
  • be of the same type, say between M.Asset entities. This type of relation is known as self-referencing

In Content Hub, it is recommended to name relations using the notation ParentEntityToChildEntity. For example AssetTypeToAsset, is a relation where M.AssetType is Parent of M.Aset. Conversely, M.Asset is Child of M.AssetType

In this blog post, I will dive more into self-referencing relations, how to define them, how to create entities and link them up as well as display them within Content Hub.

Defining self-referencing relation

We typically use self-referencing relation where you want to define some form of parent-child hierarchy within your entities of the same type. Let say we have a use-case where have a ‘master’ asset and we need to link related or supporting files, so that we can easily find all related or supporting files to master asset.

To define this, you will follow the following steps:

  1. From the dashboard, click on Schema and search and find M.Asset. Select to open the M.Asset definition management page.
  2. Click on ‘New member‘ button to launch ‘New member‘ popup below. Select Create a new relation to a non-taxonomy definition option
  3. This opens a window to capture the relation definition, conditions for the relation, whether it is mandatory among other configurations. This is similar to one below
  4. We will use the above dialog to define self-reference relation. As you can see, I have alread named my relation AssetToLinkedAsset, which mean M.Asset is Parent M.Asset, using the OneToMany cardinality. I will explain more about what is cardinality later in this blog.
  5. We will ignore defining any Conditional, Required and Advanced settings for now, we are going to use the default values, as shown below.
  6. Then click Save to create the relation. This will close the popup window and go back to the M.Asset definition management page.
  7. That is it, we have defined self-referencing relation. Ensure you click on Apply changes to commit changes on the M.Asset definition management page.
  8. If we refresh our M.Asset definition management page, you will notice we now have two relationships as shown below
  9. Content Hub will automatically generate two relations shown above, where M.Asset is Parent of M.Asset as well as M.Asset is Child of M.Asset. In fact, these fields are AssetToLinkedAsset:Parent and AssetToLinkedAsset:Child respectively within the M.Asset schema

What is relation cardinality

In Content Hub, we make use of cardinality to describes how parent and children are related. All values are from Parent => Child. Below are the supported cardinalities

  • OneToOne One parent to one child.
  • OneToMany One parent to many children
  • ManyToMany Many parents to many children.

The choice depends on your use case. In my current use case, I would like my ‘master’ asset to have one or more linked or supporting files, hence I have used OneToMany

Next steps

In this blog post, I have looked at what are self-referencing relations in Content Hub. I walked through a sample use-case for them, how to define them, and steps to follow within Content Hub. In the next follow up post, I will walk you through how to create and populate self-referencing entities and link them up to create parent-child hierarchy and to display this within Content Hub.

Stay tuned and leave us any feedback or comments.

Content Hub gems: Troubleshooting issue when creating asset public links

You may encounter this is error “The user does not have sufficient rights to create the specified entity

We will look at how to troubleshoot and resolve it. But first, what are public links?

What are public links used for?

In Content Hub, we use public links to share assets with external partners who typically do not have direct permission to download the assets. This means anyone who has access to this static URL can cache and fetch the file.

Creation of Public Links

I will start with a scenario where my Content Hub user doesn’t have permission to create public links. My user belongs to my GlobalContentCreator user group. Within Content Hub, on the Asset Details page, when my user tries to access the Public links menu, they notice it is missing as shown below.

The Public links menu is missing because the required permissions have not been configured within GlobalContentCreator user group. Below is a snippet of the existing permissions for M.Asset and M.File

You notice the CreatePublicLinks and ReadPublicLinks permissions are missing. We need to enable them first, as shown below:

With this change in place, the Public links menu now appears on the Asset Details page for my user, as shown below.

Does this resolve the issue?

I will now let my user to put this to test.

As expected, when my user clicks on the Public links menu, it opens New pubic link popup window. They proceed to fill out the form and submitting it as shown below. However, they are still getting the error. What is going on?

M.PublicLink permissions are needed as well

Asset public links are entities of type M.PublicLink. In fact, M.Asset is Parent of M.PublicLink (using the AssetToPublicLink relationship)

Therefore, I need to assign additional permissions for M.PublicLink. I need to update my GlobalContentCreator user group with the following changes:

The minimum permissions needed are Read and Create to create the public links. However, I have additionally allowed my users to update and delete them as well.

This is it. With this change, the issue is resolved and my users can happily generate public links. Happy days.

Next steps

In this blog post, I have explored steps you need to take to troubleshoot and resolve the issue “the user does not have sufficient rights to create the specified entity” when generating public links.

Stay tuned and leave us any feedback or comments.

Creating and publishing a Content Hub custom connector – Func app integration testing

In my previous blog post, I covered how to configure your Function app for debugging within your local development environment. In this blog post, we are going to carry on from where I left and look at how to start doing some end-to-end integrations tests with your Func app.

Getting your Sitecore Content Hub ready

As explained in my YouTube video – 3 Content Hub: API call action set-up, you need to set up an API call action within Content Hub. This is the action that will trigger the execution of our Func app.

Below are steps to follow to accomplish this.

  • Using Manage -> Actions menu, click on ‘New action’ button to launch the create New action popup, similar to the one shown below.
  • Populate all the required details as shown above:
    • Name: Specify the name of the API call
    • Label: Specify the display label for the API call
    • Type: Select API call from the Type dropdown list, similar to one shown below
    • Method: Select POST. This means a POST request will be sent to our Func app when this action is executed
    • API URL: Specify your Func app URL. I will provide further details later on how to obtain your Func app URL in your local Dev environment
    • Timeout: Specify a value of timeout in milliseconds. Content Hub provide a choice of 30, 60, 90, 120, 300 and 600 as of writing this blog
    • Headers: Add any custom HTTP Headers for the POST request. In my case, I have a custom X-Api-Key which I am using to specify the Func app Api key
    • Values: Add any additional meta data that you want passed into the Func app.

Getting your local Dev Func app ready for testing and debugging

As explained in my previous blog, you need to ensure your local.settings.json has all the required application settings. This is to ensure we can establish an integration between Func app and your Content Hub instance.

Then you need to build your Visual Studio project and ensure you have no Build errors. You can do this using Build -> Rebuild solution option. Alternatively, right-click on your project, and select Rebuild

Your Visual Studio Output window will show Rebuild All succeeded message, similar to the one below.

Setting up Breakpoint within the code files

To be able to debug and step-into your code files, add the relevant Breakpoints on a particular line of code using Debug -> Toggle Breakpoint menu or F9 shortcut key. In my example below, I have togged a Breakpoint on line 32.

Start running your local Dev Func app in Debug mode

We are now ready to execute our local Dev Func app in debug mode. From Debug menu, click on Start Debugging menu or select F5 shortcut key.

This will launch a Func app runtime command window, similar to the one shown below:

Your local Dev Func app is now ready to process your POST requests. The URL is indicated using the arrow above. Remember earlier on we needed to configure the Content Hub API call URL, this will be the value to use. Copy and apply this in your Content Hub accordingly.

Triggering your local Dev Func app from Content Hub

As I demonstrated in my YouTube video – 1 Cloudflare Stream connector demo, I am triggering the API call using a custom button. In my use case, I have added this button to the Blog details page. Clicking on ‘Send to Cloudflare’ button, will trigger the local Func app.

You will notice the local Func app will have activated any Breakpoints you have set up within the Visual Studio project. This will allow you to step into any lines of code that you would like to inspect at debug-level.

Sample active Breakpoint with request Debug details

Below you can see my Breakpoint on line 32, where I am inspecting debug-level details of my POST request.

Next steps

In this blog post, we have explored how to prepare both your Sitecore Content Hub API call and your local Dev Function app for integration testing. We also looked at steps of configuring and triggering the Func app whilst in debug mode. Feel free to watch the rest of my YouTube playlist where I am demonstrating the end-to-end custom connector in action. Stay tuned.

Creating and publishing a Content Hub custom connector – Func app settings and debugging

Introduction

In my previous blog post, I covered how to set-up your Func app within Visual Studio. In this post, I would like to walk you through how to configure your Func app to allow you to run and debug it in your local development environement.

Func app local.settings.json file

Within your Visual Studio project, create local.settings.json file at the root of the project. A sample json file is shown below. This will be used to configure all the configuration settings to allow you to run and debug the Func app locally.

The local.settings.json file stores app settings and settings used by local development tools. Settings in the local.settings.json file are used only when you’re running your project locally.

Because the local.settings.json may contain secrets, such as connection strings, you should never store it in a remote repository.

DevOps best practices

Microsoft Azure portal func app application settings

Similarly, you will need to configure all the configuration setting on your Microsoft Azure portal for your test or production Func app instances.

Clicking on Configuration menu, then Application settings tab will launch the page similar to the one shown below.

Depending on your needs, these application settings can be managed manually or very easily automated using DevOps pipelines.

List of required application settings

Below is a complete list of the Func app application settings

  • cf_account_id your Cloudflare account identifier
  • cf_api_base_url your Cloudflare API base URL
  • cf_api_token your Cloudflare API token
  • cf_webhook_url your Cloudflare webhook URL
  • ch_base_url your Content Hub instance base URL
  • ch_client_id your Content Hub instance client identifier
  • ch_client_secret your Content Hub instance client secret
  • ch_create_publiclinks_script_id your Content Hub action scrip identifier for creating public links
  • ch_get_data_script_id your Content Hub action scrip identifier for getting data
  • ch_password your Content Hub integration user password
  • ch_username your Content Hub integration user username
  • funcapp_api_key your custom Func app API key configured within your Content Hub integration

Next steps

In this blog post, we have explored at how to configure your Function app application settings to allow you to run and debug it in your local development environment. We also looked at configuring them on your published Func app on your Microsoft Azure portal.

Feel free to watch the rest of my YouTube playlist where I am demonstrating the end-to-end custom connector in action. Stay tuned.

Creating and publishing a Content Hub custom connector – Visual Studio project set-up guide

Background

I recently shared a video playlist on how I built a Content Hub custom connector that allows you to publish video assets into your existing video streaming platforms

On this blog post, I wanted to share details on how to setup your Visual Studio project and solution as well us how to deploy or publish the connector to your Microsoft Azure cloud.

Create a function app project

Using latest Visual Studio IDE, create a new Azure Functions project, using C# template as shown below

Choose a meaningful name for your project and progress through the next step. Ensure you select Http triggered function as show below.

Finalise the create project wizard to get your project created.

Add Content Hub web SDK reference

As shown below, add a reference to Stylelabs.M.Sdk.WebClient NuGet Package to your project.

In addition, ensure you have added the Microsoft NuGet Packages below to enable dependency injection to your Func app.

Enabling FunctionStartup in your Func app

To enable dependency injection in your project, add a Startup class similar to the one shown below. The Startup class needs to inherit the FunctionStartup, which allows us to configure and register our interfaces.

Creating Function App on Microsoft Azure portal

As explained in the video playlist, you will need to publish your Func app into your Microsoft Azure subscription.

You will need to create a Function App app in your Microsoft Azure subscription using the create template as shown below. Ensure you select relevant Subscription, Resource Group and .NET Runtime stack.

Progress through the create wizard screens to stand up your Function app in the portal.

Getting publish profile from the Microsoft Azure portal

On your newly created Function app, navigate to the Deployment Center as shown below

Clicking on the the Manage publish profile link should present a pop up window, from which you can download the publish profile. Keep note on the location where you have downloaded this publish profile file.

Importing publish profile into your Visual Studio project

Right-click on your project within VS, which should pop-up the menu shown below.

Click on the Publish… menu to launch the Publish window similar to the one shown below.

Using the Import Profile option will allow you to browse and select the publish profile file that you previously downloaded from Microsoft Azure portal. This will then successfully setup the publish profile to your Microsoft Azure subscription.

Publishing the custom connector from VS into Microsoft Azure portal

On the Publish window, you will notice your publish profile is selected, similar to one below.

Clicking on Publish button will deploy the Function app to your Microsoft Azure subscription.

Next steps

In this blog post, we have explored at how to set-up a Function app in your local developer environment, add required NuGet Packages as well us publishing it to your Microsoft Azure subscription

Feel free to watch the rest of my YouTube playlist where I am demonstrating the end-to-end custom connector in action. Stay tuned.

My Sitecore contributions in 2023

It is that time of the year once again, where Sitecore MVP 2024 applications are open.

I have had a relatively productive year compared to 2022, and below is a summary of my contributions:

Content contributions

I believe I have created content that adds value mostly within Content Hub, Sitecore Experience Edge, Sitecore Personalize among the Sitecore composable stack. I believe I have produced content that meets expectations in terms of quality, quantity, and visibility and more importantly, add value to our community. This has been through blog posts (x14 Sitecore blogs in 2023, with a total views:  2400+ so far), code sharing via GitHub, reference Architectures, YouTube content among other social channels:

LinkedIn articles:

Sitecore Hackathon 2023:

Code and architectural artifacts:

Public speaking

I am an active member of Sitecore User Group London and been working with Alex Washtell to facilitate the event held at our Avanade offices back in February 2023. I was also a speaker on the event held at Sagittarius on 9th November 2023.

Engagement

Through my social profile, I have driven engagement throughout 2023 to amplify the content I have created.

Next steps

For 2024, I look forward keeping up producing content that meets expectations in terms of quality, quantity, and visibility. Keep up and drive further engagement of wider Sitecore community by leveraging my previous MVP credentials and strong social profile. I am putting myself forward for public speaking events throughout the calendar year. I intent to continue identifying any gaps and filling them, providing product feedback, improvements, and references

Stay tuned and best of luck with those submitting the Sitecore MVP 2024 applications

Streaming Seamlessly: Integrating Content Hub with your existing video streaming platform

Background

Most businesses already have existing investments in some form of a video streaming platform, which they are leveraging to deliver marketing material such as video content to their customers. Their digital marketing teams are already familiar with tools such as YouTube, Brightcove among others, which they work with as part of their daily jobs.

Your company has recently made investments in Content Hub as strategic solution for your DAM needs in your business. With such an investment, your marketing, content, film and production teams will start using Content Hub as single repository for your videos and imagery to cater for all needs in your business.

How do you ensure your video assets within Content Hub are synced with your existing streaming channels?

You will need a connector, but we have you covered

Unfortunately, Sitecore doesn’t provide an out-of-the-box connector that you can leverage for this. You will need to build such a connector yourself, so you can have an integration between Content Hub and your existing video streaming channel.

Speaker at London SCUG on 09 Nov 2023

I had an opportunity to demonstrate this connector during the London Sitecore User Group at Sagittarius – November 09, 2023

I have also recorded a YouTube playlist on how I have build this connector, which you can watch now on my YouTube channel

See you then.

Next steps:

I will also write an accompanying blog post with links to sample code demonstrated on my YouTube channel. Stay tuned.

Content Hub gems: Leveraging action scripts to aggregate CMP content and your linked assets – part 2

Introduction

We previously looked at how to leverage action scripts to simply how to access content and linked assets with a single web API call. In this blog post, we follow up with a deep dive into the code and logic within the action script itself.

The script

The first part of the script is shown below.

  1. Line 1 to 5 has all the required libraries being used in the script
  2. Line Line 7 & 8 has logic for extracting the id of the content item, which we are gathering the data in this script. Data from the web API request is specified in Context.Data, which is a JToken. The script expects it to be a JObject containing a contentId property.
  3. Line 10 to 14 contains logic for checking whether the content id could not be extracted from the data. In which case, a response http status-code 400 (bad request) together with a user-friendly error-message is returned. This is done with help of helper function SetError, as shown below:
  4. Line 16 to 19 contain the EntityLoadConfiguration we are going to use when loading the assets linked to our content item. Only Filename, Title and Description as well as AssetToSubtitleAsset relation will be loaded in our use case.
  5. Line 21 to 24 similarly contain the EntityLoadConfiguration we are going to use when loading the content item (our blog post content type). Blog_Title, Blog_Quote, Blog_Body as well as CmpContentToMasterLinkedAsset & CmpContentToLinkedAsset relations will be loaded here. CmpContentToMasterLinkedAsset relation holds the link to the master image associated with this item. CmpContentToLinkedAsset relation has the assets linked with this item, such as the video asset.
  6. Line 26 to 31 contain the logic for loading the content (Blog post), by leveraging MClient.Entities.GetAsync function and specifying the content id and the EntityLoadConfiguration already defined above. We have a check on line 27 whether the content entity was actually found, and return a response http status-code 400 (bad request) together with a user-friendly error-message, when none was found.
  7. Line 33 to 37 start preparing the output object for our script. We have created a new JObject which has the shown properties. We have added the values of properties Blog_Title and Blog_Quote and Blog_Body. We are going to add more properties as we walk through the rest of the script.

Second part of the script

The code listing from line 39 through to 83 has the logic for loading the video asset linked with this content item.

  1. Line 39 get the list of video asset ids by using a helper function GetLinkedVideos shown below. This function makes use of the LINQ query, which filters down only entities of type M.Asset which are linked to current content id (parent in the CmpContentToLinkedAsset relation). In my use case, I have used the file extension .mp4 to identify video asset (but you could use any other property or combination of properties to meet your specific use cases)
  2. Line 40 checks if our GetLinkedVideos found any video ids, in which case the rest of the logic will try and process them
  3. Line 42 extract the first video id that was found. I have used the MCient.Logger.Info method to log user friendly messages that helped me show which video ids were found. These message appear on the Action Script’s View Logs window.
  4. Line 45 to 46 contain the logic for loading the video asset entity, by leveraging MClient.Entities.GetAsync function and specifying the video asset id and the EntityLoadConfiguration already defined before in first part of the script. Line 46 checks to ensure the video asset was found, for us to do further processing
  5. Line 48 and 49 contains the logic for getting the video asset public link, which is required as part of the output from the script. On line 48, I am leveraging GetPublicLinks function, which I have defined as shown below. I am interested in the original rendition of my video asset. Please note that if the video asset does not have original public link generated, nothing will be retrieved.
  6. Which is why the code on line 49 further makes use of a function named GetFirstPublicLinkUrl which helps load the M.PublicLink entity and inspect the RelativeUrl property, as shown below.
  7. Line 50 to 55 we are now creating a new JObject which has the shown properties as expected the output of the script. This object is added to videoAsset section of our main result object.
  8. Line 57 contain logic for getting the video asset subtitles. The AssetToSubtitleAsset is a IParentToManyChildrenRelation, so we get hold of subtitles using the Children property from this relation. In essence, a video subtitle is an asset in its own right. So the code listing from Line 59 is trying to load each of the subtitle asset and we are interested in the Title property as well as the Public Link (original rendition). This is now familiar to how we got public link for the video asset itself. We add each of these properties in a JArray, which in turn, is added to the result.

Part three of the script

In the last part of the script, we also get the master asset linked to our content item. In this case, we are interested in the asset Public Link, asset file name, Blog_Title and Blog_Body properties. We create a new JObject which has the shown properties as expected and added to the result object.

Line 103 stores our result object that we have been preparing onto the Context. This tells the script to return it to the user.

Final script output

The script output is similar to the one shown below.

This completes the code listing for this script.

Next steps

In this blog post, I have looked at the second part of the Content Hub Action Scripts for Web API use cases. We have taken a deep dive into the source code for the script, covering the various components and how they work together. For a practical use cases, look at my blog post on how I have created a custom connector for publishing video assets from Content Hub into Cloudflare Stream

Stay tuned and leave us any feedback or comments.