Introduction
On this series of blog posts, I am documenting my journey of delivering personalized content to end users of a mobile app.
- Sitecore personalize and mobile app projects series – part 1 – Introduction and overview of the solution
- Sitecore personalize and mobile app projects series – part 2a – Enabling Sitecore Experience Edge (Sitecore Content Hub)
- Sitecore personalize and mobile app projects series – part 2b – Enabling Sitecore Experience Edge (Sitecore XM Cloud)
- Sitecore personalize and mobile app projects series – part 3 (this post) – Connecting Sitecore Personalize to Sitecore Experience Edge
- Sitecore personalize and mobile app projects series – part 4a – Explore Sitecore Personalize APIs and security considerations.
- Sitecore personalize and mobile app projects series – part 4b – Sitecore Personalize API Flow executions.
- GitHub Repo – Contains code samples and related artifacts referenced in this blog series
- YouTube Channel – My YouTube Channel with videos accompanying this blog series
Connecting Sitecore Personalize to Sitecore Experience Edge
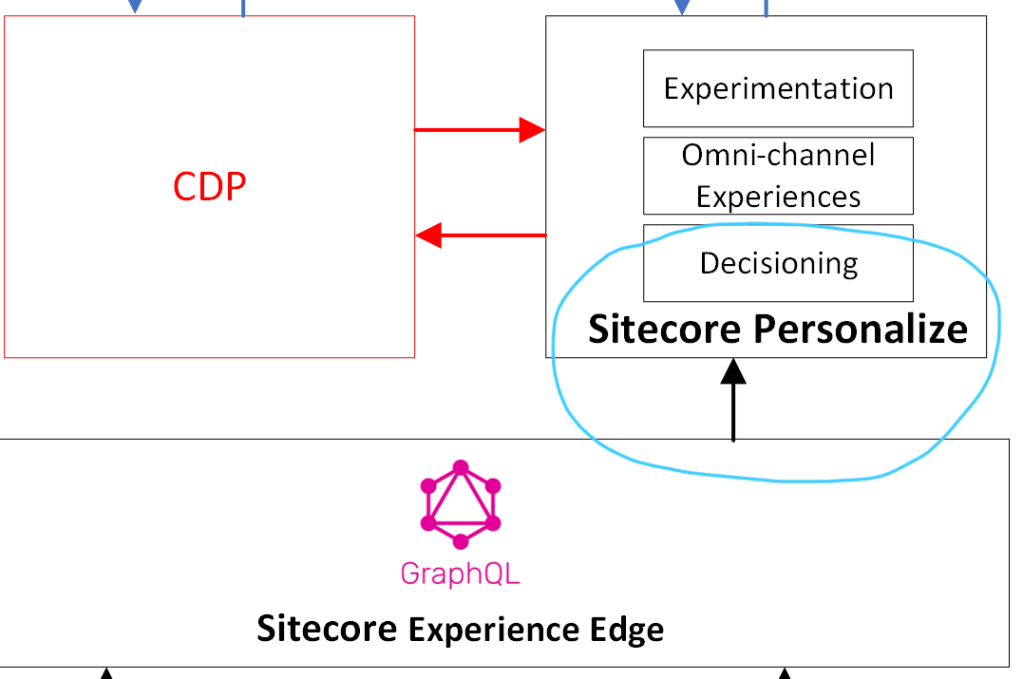
In this blog, I will deep dive into the integration between Sitecore Experience Edge and Sitecore Personalize part of the architecture, shown below. For the full reference architecture, refer to part one of this series.

What is Sitecore Personalize
Before we jump into how to integrate Sitecore Experience Edge with Sitecore Personalize, lets first look at what is Sitecore Personalize? Sitecore Personalize is cloud-native solution from Sitecore, for delivering tailored experiences to every customer, on any channel, and at scale.
Sitecore Personalize brings lots of value for marketers, including the following:
- supports experiments that optimize experiences in any digital product, app, or channel
- applies AI-driven digital decisioning capabilities to connect operational data
- provides client-side personalization
- reinforces decisioning and next-best actions and offers
- provides inbound and outbound personalization
I will be focusing on the mobile app channel, with hope of exploring all the capabilities available to us.
Getting Started with Sitecore Personalize
Partner CDP Training Sandbox
If you are part of Sitecore Partner Programme, then you should already have access to a Partner CDP Training Sandbox. You can reach out directly to Sitecore Support to get your credentials to gain access to the tenant for your partner sandbox account.
Your Partner CDP Training Sandbox will have both Sitecore CDP and Sitecore Personalize. I will NOT be covering Sitecore CDP in this post. It is not part of my solution, but feel free to explore more about it.
Depending on your location, you will access your Partner CDP Training Sandbox using either of the following URLs:
- app.boxever.com (Europe)
- app-ap.boxever.com (Asia Pacific (APAC)
- app-us.boxever.com (United States)
Request for a demo
You can also request for a Sitecore CDP demo from Sitecore by following the steps on the Request a demo page. This will require you to submit a form to Sitecore, after which you will get an invitation to sign up and access the Sitecore CDP demo tenant. Please note this will give you access to both Sitecore CDP & Personalize, at the time of this writing.
Sitecore Personalize – Navigation and Menus
The screenshots shared below are from my Partner CDP Training Sandbox, which has both Sitecore CDP & Personalize. If you are working with Sitecore Personalize only, these screenshots may have some differences for your case.
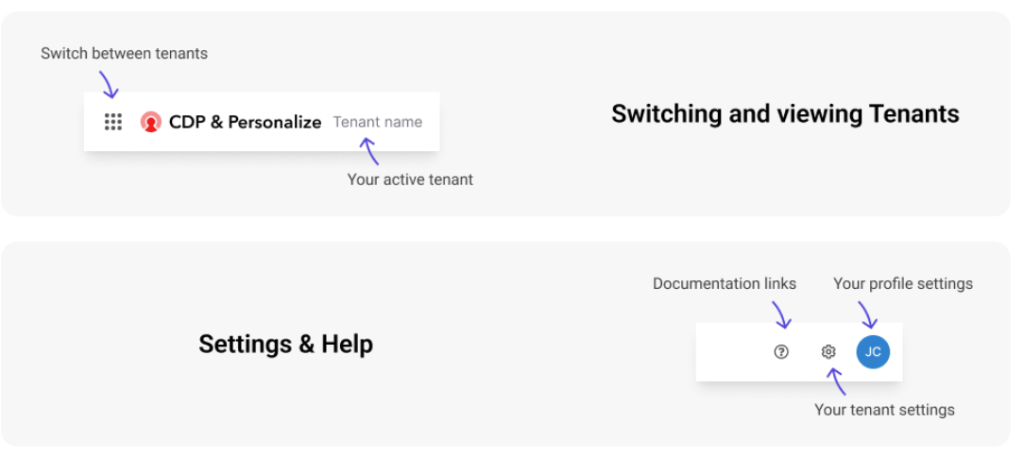
Click on the leftmost button, to the left of “CDP & Personalize” logo to switch between multiple tenants, as shown below.

For documentation links, your tenant settings, and your profile settings, use the buttons to the right of the top nav menus, as shown above
Step by step on how to connect to Sitecore Experience Edge
To add a connection to Sitecore Experience Edge, use these steps:
- Use the Developer center top nav menu item, and click on Connections sub-menu item, as shown below.
- This will open the Connections page, shown below. Click on Add Connection button on the right-hand-corner to start the process
- This will launch an Add Connection dialog box, shown below
- Select the Data System category. This will open a 5-screen wizard form to capture the new connection details. The first screen is where you name and describe your connection, as shown below. Enter the Name, Description and choose an Icon, and click Next button to progress the wizard
- In the second wizard screen, you will specify the Authenticate method. Select None. So, no need to click on Test Authentication button. Click Next to progress the wizard to the Request screen
- On the third screen, you need to Configure Request details as shown on the screenshot below

- Request URL
- On the Request URL field, select a POST request, with URL of
https://edge.sitecorecloud.io/api/graphql/v1This will be your Sitecore Experience Edge Delivery API endpoint. It is a GraphQL endpoint that exposes your approved and published content.
- On the Request URL field, select a POST request, with URL of
- Headers
- Next, you need to add custom HTTP HEADER named “X-GQL-Token”, where you will specify the API Key required for your endpoint.
- You can create this API Key from your Sitecore Content Hub instance, using the Manage -> API Keys page. Alternatively, you can create this programmatically using the Token API
- Request
- The easiest way to compose the request body is to make use GraphQL playground to compose your queries – taking advantage of schema discovery and auto-complete capabilities. As shown on the screenshot above, this is a simple query to list all approved and published assets with their Id and Title only. I grabbed this from the XHR request call on the browser developer tools
- Test Request
- Now you can click on Test Request button, which should give you some Response, like the screenshot above. If you encounter any issues at this step, it is either you have a wrong API Key or a malformed GraphQL query. One tip is to ensure the “query” part of the request has been formatted into a single line, as shown above.
- Click Next button to progress the wizard to the fourth step, the Map screen
- We will revisit the map screen later on during this project. Skip this for now, by clicking on Next button to progress to final screen of this five-step wizard
- On the last Review & Save screen, you will see the summary of your details. If you are happy with everything, click on Save button to complete the wizard
You have now successfully established a connection with your Sitecore Experience Edge, and this will be available on your Connections list, for use in the future steps.
What is GraphQL
GraphQL is a query language for APIs that allows clients to specify exactly which data they want to fetch by making a single request and providing a query with the desired data fields.
Below is a screenshot of the GraphQL playground available using
https://edge.sitecorecloud.io/api/graphql/ide/
Next Steps
This completes this blog, where I have walked you through getting your Sitecore Personalize connected with your Sitecore Experience Edge. I hope you find this useful, and feel free to leave me any comments or thoughts.
In my next blog, I will be looking at Sitecore Personalize capabilities, APIs and how to integrate it with the mobile app. Stay tuned.


5 thoughts on “Sitecore personalize and mobile app projects series – part 3”